Sunday, August 28, 2016

Light & Fluffy Cheddar Onion Biscuits…the best I have ever baked!

More great treats up at Greenlake in the Cariboo!

Recipe By: Miriam Borys Busby

Yield:  16 biscuits

Ingredients:

3 cups flour 
1 tsp. salt
3 tsp. baking powder 
3/4 tsp. baking soda
2 tsp. sugar
3/4 cup cold butter

2 1/2 cups cheddar cheese (sharp) - shredded
1/2 cup grated parmesan cheese
1/4 cup green onion - diced 
1 cup milk - cold
1/2 cup plain yogurt or sour cream

1/4 cup milk for the milk wash at the end before baking
salt for garnish


Directions
Preheat oven to 375°. 

In a large bowl, mix together the flour, soda, baking powder, salt and sugar.
Cut in the cold butter with a pastry cutter until the butter is pea size.
Add thee grated cheeses and chopped green onion.

Miriam's Time Saving Tip♥  At this point you can store the dry ingredients plus butter and cheeses in the fridge in a zip lock plastic bag. When you are ready to bake and serve the biscuits, take the bag out of the fridge and pour the contents into a bowl and follow the remaining instructions below. I like to pre-make these biscuits because all the prep mess is done and out of the way. 

Add milk to the yogurt and mix together well.
Stir milk mixture into dry mixture just until moistened and the biscuit dough starts to come together in a ball. 
Turn out onto a lightly floured surface. 
Roll dough out to 1 in. thickness and cut with a biscuit cutter. To  get 16 biscuits i used a 2 1/4 inch cutter as seen in the photo to the right.


2 1/4 inch cutter
Place onto a parchment lined baking sheet. 
Milk wash the tops and sprinkle each biscuit lightly with salt.
Bake 15 - 20  minutes or until golden brown. Serve warm.


milk washed biscuits ready to go into a pre-heated oven


‘Cooking Uncovered’ © all rights reserved

Chef Miriam Borys Busby, B.Ed., MA.
'Cooking Uncovered'
http://www.youtube.com/user/mlborys?feature=mhee
blog: www.cookinguncovered.blogspot.com
Website: www.miriamborys.com 


Friday, August 26, 2016

Blueberry Lemon Sour Cream Pie with Crumble Topping

blueberry sour cream pie with crumble topping
Recipe by:  Miriam Borys Busby

Miriam's Time Saving Tip Making this pastry ahead is a great time saver. It keeps well for over a week in the fridge as long as it is wrapped well. After making pies. Freeze the remaining pastry for use later.


Blueberry Filling:

1/2  cup sugar
1/8 cup flour, or minit tapioca (Clear Jel is also another thickening agent but I have only been able find it at Snowcap - a local bakery supply company)
1  zest of 1 lemon
Mix the sugar, flour & zest together in a bowl.
2 tbsp. lemon juice
5-6 cups blueberries (fresh or frozen)

Roll out the pastry as shown below and line one pie plate with the pastry. Fold under excess pastry to make a higher crust edge and finger flute the edge to make it look pretty.

In a large bowl mix the blueberries with all the remaining ingredients.   Allow to sit while you role out your pastry.

Make the crumble topping and the sour cream mixture. Set aside.

Crumble Topping
½ cup flour
½ cup brown sugar
¼ cup melted butter
Melt butter. In a small bowl mix flour and brown sugar with melted butter. Set aside for topping.
SOUR CREAM Mixture
1 egg
1  cup granulated sugar
1/3 cup flour
1 cup sour cream

Pour the blueberry mixture into a pastry lined pie.  Top with the sour cream mixture.  Then top with the crumble topping.

Bake for approx. 75 minutes at 350 degrees until the blueberry juices just start to run out of the pie. Always preheat your oven before baking your pie.


**egg wash - 1 egg with a drop of milk...mix well with a fork first


Thursday, August 25, 2016

Marinated Prawn Salad With Fresh Ginger and Avocado


By: Miriam Borys Busby


Servings: 6

Ingredients:
avocados
Lemon juice

1 400g bag Prawns - cooked & peeled  
1 juice of a lemon
¼ cup shallots or red onion - diced brunoise
½ cup fresh cilantro
½ cup celery - diced brunoise

10 grape tomatoes -diced in half
2 tablespoon white balsamic vinegar
2 tablespoon Olive oil
2 tablespoon Freshly grated ginger -peeled first
Salt & pepper - dash of each
Dash hot sauce
½ box Arugula & spinach greens

Salad Dressing 
½ cup sour cream
½ cup mayo
¼ cup goats cheese
¼ cup sun dried tomatoes - diced fine
1 tsp. Hot sauce
3 tablespoon white balsamic vinegar
1 tsp. Italian herbs Salt & pepper

To prepare ahead, the prawn salad filling can be made in the morning to be served at dinner time. 
To get a head start I cut the avocado in half and scoop out the half in one piece with a large spoon. 
Place the halves of avocado in a bowl and drizzled with lemon juice. This prevents the avocado from turning brown.


Meanwhile, dice up cooked prawns into smaller
pieces (this helps when serving as the salad stays inside the ½ avocado). You can either buy the cooked prawns or buy them raw and sauté them yourself in butter and olive oil.

Wash celery & dice brunoise (very small).
Wash and chop cilantro.
Dice shallot and tomatoes. Grate peeled ginger.
Add prawns, celery, cilantro, shallot, tomatoes & ginger into a mixing bowl.
Pour olive oil, hot sauce and white balsamic vinegar over prawn mixture. Squeeze lemon juice onto prawn mixture as well and add salt and pepper to taste and store in fridge until meal time.
Wash salad greens. 


To plate this salad place a layer of salad greens onto plate. Place an avocado half (or two) onto greens. Spoon a good portion of the marinated prawn mixture on to the avocado.

Place a dollop of salad dressing onto prawn mixture. 


Friday, August 19, 2016

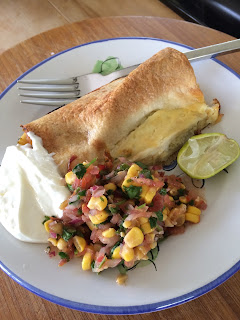
Time-Saver Breakfast Wraps (Vegetarian or Not!)

Recipe Title: Time-Saver Breakfast Wraps  (Vegetarian or Not!)

Presented By: Miriam Borys Busby 

Original Recipe from:  Carol Booth, Calgary Alberta

Yield:  4 servings

Ingredients:


2 tbsp. oil
2 tbsp. butter
1 large onion - diced
1 large red pepper (small diced)
1 yellow zucchini - small diced
5 sticks of asparagus (remove woody ends and chop up)
1/2 bunch cilantro (washed and chopped)
5-6 garlic cloves chopped
1 small serrano pepper - this adds a little heat that is delicious
1 cup shredded cheese (white cheddar works well but it is your choice) - there is always an option to use more cheese….for a nice finish add shredded cheese to the top of the wraps when they come hot out of the oven….yummy!
3-4 large tortilla wraps (corn or flour)
1 cup ham - cubes (optional)
4 large eggs
1 cup milk

Procedure:
Saute onions first in oil and butter until transparent and then add diced vegetables and garlic and cook over medium heat until just tender. Remove from the heat and cool.
Shred the cheese and set aside.
Portion out the sautéed vegetables and the ham and spoon inside each of the 3 or 4 wraps depending on the size of your casserole dish.
Place into a well-greased casserole dish.
Wisk the eggs and the milk and pour over the filled wraps.
Cover with plastic and store in the fridge until breakfast time. 
2 hours before cooking time remove the wraps from the fridge and allow to sit at room temperature.
Pre-heat oven to 350° F (175° C).
Put breakfast wraps into the oven and cook for 50 minutes uncovered. Remove from the oven and let the wraps sit for 10 minutes to set after baking.
Serve with sour cream and fresh corn salsa (click here to go to my recipe)  as a great option.
This dish is also great as leftovers. Heat up in the microwave or the oven and they are even better the second day. Thanks Carol, my friend for this great recipe.

‘Cooking Uncovered’ © all rights reserved


Chef Miriam Borys Busby, B.Ed., MA.
'Cooking Uncovered'
http://www.youtube.com/user/mlborys?feature=mhee
blog: www.cookinguncovered.blogspot.com
Website: www.miriamborys.com

Tuesday, August 9, 2016

Fresh Tomato, Basil & Garlic Pasta


Presented By: Miriam Borys Busby

Original Recipe By:  Maggie Dickey

Yield:  2 servings

Ingredients:
1/3 cup olive oil
6 large cloves of garlic (or more if desired) - diced
4 medium sized tomatoes - diced
1 cup fresh basil
2 cups arugula or fresh greens of choice (optional but very tasty)
salt & pepper
fresh basil at Greenlake
pasta of choice for 2  
garnish:  shaved parmesan (optional)

In a sauce pan heat oil and slowly sauté diced garlic.  Do not overcook.
Remove from the heat and add diced tomatoes and fresh basil.  Season with salt and pepper.
Stir well and cover and allow to marinate for as long as you can. I try to make the sauce in the morning and  refrigerate until dinner time but if time is a factor it can be made and served immediately.
At dinner time boil salted water for the pasta.
When the water comes up to the boil add the pasta and cook al dente.
At this time remove the sauce from the fridge and heat up the sauce on the stove on medium heat until the sauce is just warm. Do not overcook at the stage or the ‘fresh’ tomato appeal will be gone.
Add more fresh basil just before service along with the arugula. Stir well and serve.


Garnish with shaved parmesan if desired.
Enjoy and thank you to my friend Maggie for this amazing recipe.

‘Cooking Uncovered’ © all rights reserved


Chef Miriam Borys Busby, B.Ed., MA.
'Cooking Uncovered'
http://www.youtube.com/user/mlborys?feature=mhee
blog: www.cookinguncovered.blogspot.com
Website: www.miriamborys.com

Saturday, August 6, 2016

Salsa with Corn on the Cob

Salsa with Corn on the Cob


4 cobs of fresh corn (husks and silk removed & 
1/2 large red onion - small diced
1/2 - 1 serrano pepper, seeded, diced
3 tomatoes (large) underripe tomatoes are easier to dice up
2 limes -  juiced
1/2 bunch cilantro (approx. 1 cup)
1/2 tsp.  salt
pepper to taste
1/2 cup   prepared tomato salsa (use the leftover salsa from the fridge if you have it) or 1/2 cup of pureed canned tomatoes (this is optional but it does add some 


1.     Cook corn on the cob until just tender. Cool immediately in cold water so it doesn’t continue to cook. When cool cut corn off the cob. Add to a large mixing bowl.
2.    Dice vegetables. Using a Mandoline is an easy way to quickly dice up tomatoes, seranno peppers and red onion.
3.    Into a large bowl add diced tomatoes, red onion, cilantro, & Serrano pepper
4.    add canned tomatoes or salsa and the juice of two limes.
5.    Salt and pepper to taste
6.     Mix well and allow to cool in the fridge.
7.     Serve with your favourite tortilla chips or as a garnish on your favourite egg dish for breakfast. 


Helpful Tips:
- husk the corn just before cooking, pull all the husks off of the corn and discard. Remove silk (the white hairy threads just under the husk) from the corn and discard before boiling corn

 - cook corn in a pot of boiling water. Once the water has come to the boil, insert the corn on the cob. Allow the water to come up to the boil again and boil for 2-3 minutes only. Remove cobs of corn and discard hot water. Cool corn cobs in cold water. Discard water and allow to cool in fridge. Corn will become saturated in water if allowed to sit in the water which is not good for the corn.